SVG Image Borders

This app creates circular and elliptical borders for text on a web page, made up of images. In this example the images are svg but any hrml acceptable image could be used:

imgFrameText

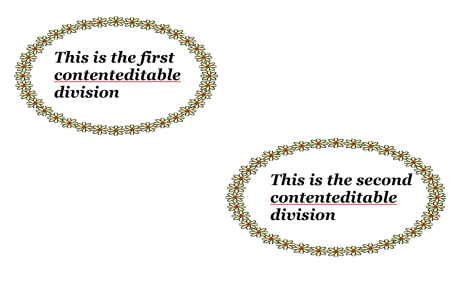
The html file creates 5 divisions and corresponding svg elements.
This is that code:

<!DOCTYPE html>
<html>
<style>
body{}
#frame{}
svg{position: absolute; width: 0; height: 0; top: 0; left: 0}
</style>
<body>
<div id=”frame” style=”position: absolute; left: 0; top: 0; width: 100%; height: 100%”>
<div id= “d1” style = “position: absolute; left: 200px; top: 150px; font: italic normal 800 24px Georgia” contenteditable = “true” onclick=’getId(this.id);’ ondblclick=’drawCircle();’ >d1</div>
<div id= “d2” style = “position: absolute; left: 200px; top: 250px; font: italic normal 800 24px Georgia” contenteditable = “true” onclick=’getId(this.id);’  ondblclick=’drawCircle();’ >d2</div>
<div id= “d3” style = “position: absolute; left: 200px; top: 350px; font: italic normal 800 24px Georgia” contenteditable = “true” onclick=’getId(this.id);’  ondblclick=’drawCircle();’ >d3</div>
<div id= “d4” style = “position: absolute; left: 200px; top: 450px; font: italic normal 800 24px Georgia” contenteditable = “true” onclick=’getId(this.id);’  ondblclick=’drawCircle();’ >d4</div>
<div id= “d5” style = “position: absolute; left: 200px; top: 550px; font: italic normal 800 24px Georgia” contenteditable = “true” onclick=’getId(this.id);’  ondblclick=’drawCircle();’ >d5</div>

<svg id=”svg1″ ></svg>
<svg id=”svg2″></svg>
<svg id=”svg3″></svg>
<svg id=”svg4″></svg>
<svg id=”svg5″></svg>
</div>
http://imgFrame.js

</body></html>

Everything else is done in a js file:
var rad = 0; var ang;  var anginc; var str; var sclx = 1; scly = 1; var mov = false; var nm; var cnt; var oldURL = “tmp.html”; var cnt2 = 0;

function drawCircle() {
  document.getElementById(nm).style.zIndex -= 1;
nm = “svg” + cnt;
rad = 300;
sclx = 1;
scly = 1;
document.getElementById(“svg” + cnt).style.width=”100%”;
document.getElementById(“svg” + cnt).style.height=”100%”;
ang = (-10 * (Math.PI / 180));
anginc = 10 * (Math.PI / 180);

for (var i = 0; i <= 37; i ++) {
ang += anginc;

var xval = rad + rad * Math.cos(ang) ;
var yval = rad + rad * Math.sin(ang);

document.getElementById(“svg” + cnt).innerHTML += ‘<image x=”‘ + xval + ‘” y=”‘ + yval + ‘” width=”56″ height=”56″ href=”8Petal.svg” />’
}
document.getElementById(“svg” + cnt).innerHTML  = ‘<g id=”gframe’ + cnt + ‘” >’ + document.getElementById(“svg” + cnt).innerHTML + ‘</g>’;
str = rad + “px ” + rad + “px”;
document.getElementById(“gframe” + cnt).style.transformOrigin = str;

document.getElementById(“svg” + cnt).style.width = (2.2 * rad) + “px”;
document.getElementById(“svg” + cnt).style.height = (2.2* rad) + “px”;
document.getElementById(“svg” + cnt).style.left = “10px”;
document.getElementById(“svg” + cnt).style.top = “10px”;
}
document.onmousemove = mv; document.onkeydown = setMove;

function setScale(par) {
if (par == “+”) scly += .02;
if (par == “-“) scly -= .02;
if (par == “r”) sclx += .02;
if (par == “l”) sclx -= .02;

document.getElementById(“gframe” + cnt).style.transform = “scaleX(” + sclx + “) scaleY(” + scly + “)” ;
}

function setMove(e) {
if(e.keyCode == 18) mov = true
if(e.keyCode == 17) mov = false;
if(e.keyCode == 38) setScale(“+”);
if(e.keyCode == 40) setScale(“-“);
if(e.keyCode == 37) setScale(“l”);
if(e.keyCode == 39) setScale(“r”);
if(e.keyCode == 9) sve();
if(e.keyCode == 27) trim();
}

function mv(e) {
if (mov) {
if (nm.indexOf(“d”) != -1) rad = 0;
posX = e.pageX ;
posY = e.pageY;
document.getElementById(nm).style.left= (posX – rad) + “px”;
document.getElementById(nm).style.top= (posY – rad) + “px”;
}
}

function getId(par) {
if (cnt2 == 2) cnt2 = 0;
cnt2 ++;
nm = par;
cnt = par.substr(1);
document.getElementById(nm).style.zIndex += 1;
if (cnt2 == 2) selectElementContents(document.getElementById(nm));
}

function trim() {
document.getElementById(“d” + cnt).remove();
document.getElementById(“svg” + cnt).remove();
var fr = document.getElementById(“frame”);
fr.innerHTML = fr.innerHTML.replace(‘<div id= “d’ + cnt + ‘” style = “position: absolute; left: 200px; top: 250px; font: italic normal 800 24px Georgia” contenteditable = “true” onclick=\’getId(this.id);\’  ondblclick=\’drawCircle();\’ >d’ + cnt + ‘</div>’,”);
fr.innerHTML = fr.innerHTML.replace(‘<svg id=”svg’ + cnt + ‘” ></svg>’,”);
}

function sve() {
  var textToSave = ‘<!DOCTYPE HTML> <html> <head> <title></title> <style> svg{position: absolute; width: 0; height: 0; top: 0; left: 0} </style> </head> <body> ‘ + document.getElementById(“frame”).innerHTML + ‘ </body></html>’;
alert(textToSave);
var textToSaveAsBlob = new Blob([textToSave], {type:”text/plain”});
var textToSaveAsURL = window.URL.createObjectURL(textToSaveAsBlob);
fileNameToSaveAs = prompt(“FileName to save as”,oldURL);
oldURL = fileNameToSaveAs;
var downloadLink = document.createElement(“a”);
downloadLink.download = fileNameToSaveAs;
downloadLink.innerHTML = “Download File”;
downloadLink.href = textToSaveAsURL;
downloadLink.onclick = destroyClickedElement;
downloadLink.style.display = “none”;
document.body.appendChild(downloadLink);
downloadLink.click();
}

function destroyClickedElement(event) {
document.body.removeChild(event.target);
}

function selectElementContents(el) {
    var range = document.createRange();
    range.selectNodeContents(el);
    var sel = window.getSelection();
    sel.removeAllRanges();
    sel.addRange(range);
}

Clicking a division twice selects its text:
function getId(par) {
if (cnt2 == 2) cnt2 = 0;
cnt2 ++;
nm = par;
cnt = par.substr(1);
document.getElementById(nm).style.zIndex += 1;
if (cnt2 == 2) selectElementContents(document.getElementById(nm));
}

function selectElementContents(el) {
    var range = document.createRange();
    range.selectNodeContents(el);
    var sel = window.getSelection();
    sel.removeAllRanges();
    sel.addRange(range);
}

Hitting the backspace deletes any text for divisions that will not be used and then hitting esc then removes the division and any mention in the source code:

function setMove(e) {
if(e.keyCode == 18) mov = true
if(e.keyCode == 17) mov = false;
if(e.keyCode == 38) setScale(“+”);
if(e.keyCode == 40) setScale(“-“);
if(e.keyCode == 37) setScale(“l”);
if(e.keyCode == 39) setScale(“r”);
if(e.keyCode == 9) sve();
if(e.keyCode == 27) trim();
}

function trim() {
document.getElementById(“d” + cnt).remove();
document.getElementById(“svg” + cnt).remove();
var fr = document.getElementById(“frame”);
fr.innerHTML = fr.innerHTML.replace(‘<div id= “d’ + cnt + ‘” style = “position: absolute; left: 200px; top: 250px; font: italic normal 800 24px Georgia” contenteditable = “true” onclick=\’getId(this.id);\’  ondblclick=\’drawCircle();\’ >d’ + cnt + ‘</div>’,”);
fr.innerHTML = fr.innerHTML.replace(‘<svg id=”svg’ + cnt + ‘” ></svg>’,”);
}

Typing in a selected division inserts any text you want.
Double clicking the selected division created a circular border:
<div id=”frame” style=”position: absolute; left: 0; top: 0; width: 100%; height: 100%”>
<div id= “d1” style = “position: absolute; left: 200px; top: 150px; font: italic normal 800 24px Georgia” contenteditable = “true” onclick=’getId(this.id);’ ondblclick=’drawCircle();’ >d1</div>

function drawCircle() {
  document.getElementById(nm).style.zIndex -= 1;
nm = “svg” + cnt;
rad = 300;
sclx = 1;
scly = 1;
document.getElementById(“svg” + cnt).style.width=”100%”;
document.getElementById(“svg” + cnt).style.height=”100%”;
ang = (-10 * (Math.PI / 180));
anginc = 10 * (Math.PI / 180);

for (var i = 0; i <= 37; i ++) {
ang += anginc;

var xval = rad + rad * Math.cos(ang) ;
var yval = rad + rad * Math.sin(ang);

document.getElementById(“svg” + cnt).innerHTML += ‘<image x=”‘ + xval + ‘” y=”‘ + yval + ‘” width=”56″ height=”56″ href=”8Petal.svg” />’
}
document.getElementById(“svg” + cnt).innerHTML  = ‘<g id=”gframe’ + cnt + ‘” >’ + document.getElementById(“svg” + cnt).innerHTML + ‘</g>’;
str = rad + “px ” + rad + “px”;
document.getElementById(“gframe” + cnt).style.transformOrigin = str;

document.getElementById(“svg” + cnt).style.width = (2.2 * rad) + “px”;
document.getElementById(“svg” + cnt).style.height = (2.2* rad) + “px”;
document.getElementById(“svg” + cnt).style.left = “10px”;
document.getElementById(“svg” + cnt).style.top = “10px”;
}

Either a division or its border can be moved:
document.onmousemove = mv;

The division should be moved while it is selected. Creating a border automatically selects it.

function mv(e) {
if (mov) {
if (nm.indexOf(“d”) != -1) rad = 0;
posX = e.pageX ;
posY = e.pageY;
document.getElementById(nm).style.left= (posX – rad) + “px”;
document.getElementById(nm).style.top= (posY – rad) + “px”;
}
}

The alt key allows the response to the mousemove and the control blocks it.

The border should be placed around the division and the arrow keys used to adjust it either horizontally or vertically, using the scale function of a <g> element:
function setScale(par) {
if (par == “+”) scly += .02;
if (par == “-“) scly -= .02;
if (par == “r”) sclx += .02;
if (par == “l”) sclx -= .02;

document.getElementById(“gframe” + cnt).style.transform = “scaleX(” + sclx + “) scaleY(” + scly + “)” ;
}

Interactively Place and Size Images on web page

This file places and sizes images on a web page.
Here is an example:

imgPlaceText

The resulting code can also be saved to a html file:

imgPlaceText2

This is the code:

<!DOCTYPE html>
<html>
<style>
#d1,#svg1{position: absolute;width: 100%; height:200%; top:40px}

</style>
<body>
<center><select id=”s1″><option>Choose Folder</option><option>A-E/</option><option>F-J/</option><option>K-O/</option><option>P-R/</option><option>S-T/</option><option>SVG/</option></select> <input type=”file” id = “fil1″ /> <select id=”s2″><option>left</option><option>right</option></select> <input type=”button” id=”b1″ value=”New Image” onclick=’document.getElementById(“s2”).value = “left”;’/> <input type=”button” id=”b2″ value=”Undo” onclick=’undo();’ /> <input type=”button” id=”b3″ value=”Save” onclick=’sve();’ /></center>
<svg id=”svg1″>
<defs>
<pattern id=”smallGrid” width=”10″ height=”10″ patternUnits=”userSpaceOnUse”>
<path d=”M 10 0 L 0 0 0 10″ fill=”none” stroke=”gray” stroke-width=”0.5″/>
</pattern>
<pattern id=”grid” width=”100″ height=”100″ patternUnits=”userSpaceOnUse”>
<rect width=”100″ height=”100″ fill=”url(#smallGrid)”/>
<path d=”M 100 0 L 0 0 0 100″ fill=”none” stroke=”gray” stroke-width=”1″/>
</pattern>
</defs>
<rect width=”100%” height=”100%” fill=”url(#grid)” />
</svg>

<div id=”d1″></div>
<script>
var posX; var posY; var lft; var rt; var fl; var wd; var cnt = 0; var back = “”; var oldURL = “tmp.html”; document.getElementById(“d1”).onmousemove = mv; document.onkeyup = setMove; var mov = false;

document.getElementById(“d1”).onclick = getMouse2;

function setMove(e) {
if(e.keyCode == 18) mov = true;
if(e.keyCode == 17) mov = false;
}

function mv(e) {
if (mov) {
posX = e.pageX ;
posY = e.pageY – 35;
document.getElementById(“im” + cnt).style.top = (posY) + “px”;
document.getElementById(“im” + cnt).style.left = (posX – 5) + “px”;
}
}

function getMouse2(e) {
posX = e.pageX ;
back = document.getElementById(“d1”).innerHTML;
fl = document.getElementById(“fil1”).value;
if(fl.indexOf(“fake”) != -1) fl = fl.substr(12);
fl = document.getElementById(“s1”).value + fl;

if (document.getElementById(“s2”).value == “left”) {
cnt ++;
posY = e.pageY – 35;
lft = posX – 5;
document.getElementById(“d1”).innerHTML += ‘<img id = “im’ + cnt + ‘” src=”‘ + fl + ‘” style = “position: absolute; left: ‘ + lft + ‘px; top: ‘ + posY + ‘px” />’;
}

if (document.getElementById(“s2”).value == “right”) {

rt = posX – 5;
wd = rt – lft;
document.getElementById(“im” + cnt).style.width = wd + “px”;
}
}

function undo() {
document.getElementById(“d1”).innerHTML = back;
}

function sve() {
var textToSave = ‘<!DOCTYPE HTML> <html> <head> <title>Title</title> <style>body{}</style></head> <body>’ + document.getElementById(“d1”).innerHTML + ‘ </body></html>’;
var textToSaveAsBlob = new Blob([textToSave], {type:”text/plain”});
var textToSaveAsURL = window.URL.createObjectURL(textToSaveAsBlob);
fileNameToSaveAs = prompt(“FileName to save as”,oldURL);
oldURL = fileNameToSaveAs;
var downloadLink = document.createElement(“a”);
downloadLink.download = fileNameToSaveAs;
downloadLink.innerHTML = “Download File”;
downloadLink.href = textToSaveAsURL;
downloadLink.onclick = destroyClickedElement;
downloadLink.style.display = “none”;
document.body.appendChild(downloadLink);
downloadLink.click();
}

function destroyClickedElement(event) {
document.body.removeChild(event.target);
}


</script>
</body></html>

To make it easier to place and size, a grid has been provided:
<svg id=”svg1″>
<defs>
<pattern id=”smallGrid” width=”10″ height=”10″ patternUnits=”userSpaceOnUse”>
<path d=”M 10 0 L 0 0 0 10″ fill=”none” stroke=”gray” stroke-width=”0.5″/>
</pattern>
<pattern id=”grid” width=”100″ height=”100″ patternUnits=”userSpaceOnUse”>
<rect width=”100″ height=”100″ fill=”url(#smallGrid)”/>
<path d=”M 100 0 L 0 0 0 100″ fill=”none” stroke=”gray” stroke-width=”1″/>
</pattern>
</defs>
<rect width=”100%” height=”100%” fill=”url(#grid)” />
</svg>

Inserting and sizing is done with getMouse2(e):
document.getElementById(“d1”).onclick = getMouse2;

function getMouse2(e) {
posX = e.pageX ;
back = document.getElementById(“d1”).innerHTML;
fl = document.getElementById(“fil1”).value;
if(fl.indexOf(“fake”) != -1) fl = fl.substr(12);
fl = document.getElementById(“s1”).value + fl;

if (document.getElementById(“s2”).value == “left”) {
cnt ++;
posY = e.pageY – 35;
lft = posX – 5;
document.getElementById(“d1”).innerHTML += ‘<img id = “im’ + cnt + ‘” src=”‘ + fl + ‘” style = “position: absolute; left: ‘ + lft + ‘px; top: ‘ + posY + ‘px” />’;
}

if (document.getElementById(“s2”).value == “right”) {

rt = posX – 5;
wd = rt – lft;
document.getElementById(“im” + cnt).style.width = wd + “px”;
}
}

The image is obtained with the following:
fl = document.getElementById(“fil1”).value;
if(fl.indexOf(“fake”) != -1) fl = fl.substr(12);
fl = document.getElementById(“s1”).value + fl;

There is a select with the options “left” and “right”.
“left” inserts the image:
if (document.getElementById(“s2”).value == “left”) {
cnt ++;
posY = e.pageY – 35;
lft = posX – 5;
document.getElementById(“d1”).innerHTML += ‘<img id = “im’ + cnt + ‘” src=”‘ + fl + ‘” style = “position: absolute; left: ‘ + lft + ‘px; top: ‘ + posY + ‘px” />’;
}
The incremented cnt is used to set the id of the image.

“right” is used to size the image:
if (document.getElementById(“s2”).value == “right”) {

rt = posX – 5;
wd = rt – lft;
document.getElementById(“im” + cnt).style.width = wd + “px”;
}

“right” is only used to size. everything else should be donwe with “lef”.

The image can be placed with mousemove:
document.getElementById(“d1”).onmousemove = mv;

function mv(e) {
if (mov) {
posX = e.pageX ;
posY = e.pageY – 35;
document.getElementById(“im” + cnt).style.top = (posY) + “px”;
document.getElementById(“im” + cnt).style.left = (posX – 5) + “px”;
}
}

To prevent accidental moving, the move is controlled with the boolean variable mov, controlled by the alt and crtl keys:
document.onkeyup = setMove;

function setMove(e) {
if(e.keyCode == 18) mov = true;
if(e.keyCode == 17) mov = false;
}

There is also an undo function:
back = document.getElementById(“d1”).innerHTML;

function undo() {
document.getElementById(“d1”).innerHTML = back;
}

back is set before the new image us inserted.

Generate SVG Flowers

This file creates Daisy-like svg flowers located where you click the screen. You can set the size, the petal coloir and the background color. It is possible to create multiple flowers on the same screen. After 5 flowers, the process slows and after 7, becomes excessively slow.
There is also an Undo button to remove the last flower. With each addition, a text box copies the element code to the clipboard, where it can be pasred into anither html file. Also, double clicking the text box adds and copies additional code, to display the result by opening a text editor, pasting and saving as a html file.

This is an example:

flowerText

This is the code:

<!DOCTYPE html>
<html>
<style>
svg{position: absolute;width:100%;height:100%; top: 40px; left: 0; background:aqua}
</style>
<body>
<center><input type=”text” id=”t1″ value = “” placeholder = “size” /> <input type=”color” id=”clr1″ value=”#ffffff” /> <input type=”color” id=”clr2″ value=”#ffffbb” /> /> <input type=”button” id= “b1” value = “Undo” onclick=’undo();’ /> <input type=”text” id=”t2″ style=”width: 500px” value=”” ondblclick=’getCode();’/></center>
<svg id=”svg1″>
<g id=”g1″>
<ellipse id=”e1″ rx=”0″ ry=”80″ fill = “none” stroke=”black” stroke-width= “3” />
<ellipse id=”e2″ rx=”0″ ry=”80″ fill=”#ffff99″ />
</g>
<g id=”g2″ >
<ellipse id=”e3″ rx=”0″ ry=”80″ fill = “none” stroke=”black” stroke-width= “3” />
<ellipse id=”e4″ rx=”0″ ry=”80″ fill=”#ffff99″ />
</g>
<g id=”g3″ >
<ellipse id=”e5″ rx=”0″ ry=”80″ fill = “none” stroke=”black” stroke-width= “3” />
<ellipse id=”e6″ rx=”0″ ry=”80″ fill=”#ffff99″ />
</g>
<g id=”g4″ >
<ellipse id=”e7″ rx=”0″ ry=”80″ fill = “none” stroke=”black” stroke-width= “3” />
<ellipse id=”e8″ rx=”0″ ry=”80″ fill=”#ffff99″ />
</g>
<g id=”g5″ >
<ellipse id=”e9″ rx=”0″ ry=”80″ fill = “none” stroke=”black” stroke-width= “3” />
<ellipse id=”e10″ rx=”0″ ry=”80″ fill=”#ffff99″ />
</g>
<ellipse id=”e11″ rx=”0″ ry=”40″ fill=”brown” />
</svg>

<script>
var posX; var posY; var l; var l2; var l3; var svgstr = “”; var back = “”; var rot = [“72deg”,”144deg”,”216deg”,”288deg”];

document.getElementById(“svg1”).onclick = getMouse2;

function getMouse2(e) {

posX = e.pageX;
posY = e.pageY – 25;

back = document.getElementById(“svg1”).innerHTML;
l = parseInt(document.getElementById(“t1”).value) /2;
l2 = parseInt(l) / 2.5 ;
var l3 = l2 * 1.5;
l2 += “”;
l3 += “”;

var str = posX + “px ” + posY + “px”;
for (var i = 1; i <=5; i ++) {
document.getElementById(“g” + i).style.transformOrigin = str;
if (i > 1) document.getElementById(“g” + i).style.transform = “rotate(” + rot[i – 2] + “)”;
}

for (var i = 1; i <= 11; i ++) {
document.getElementById(“e” + i).setAttribute(“cx”, posX);
document.getElementById(“e” + i).setAttribute(“cy”, posY – parseInt(l));
document.getElementById(“e” + i).setAttribute(“rx”, l2);
document.getElementById(“e” + i).setAttribute(“ry”, l);
if (i != 11) document.getElementById(“e” + i).setAttribute(“fill”, document.getElementById(“clr2”).value);
}
document.getElementById(“e11”).setAttribute(“rx”, l3);
document.getElementById(“e11”).setAttribute(“ry”, l3);
document.getElementById(“e11”).setAttribute(“cx”, posX + “px”);
document.getElementById(“e11”).setAttribute(“cy”, posY + “px”);
document.getElementById(“svg1”).style.backgroundColor = document.getElementById(“clr1”).value;
document.getElementById(“svg1”).innerHTML = svgstr + document.getElementById(“svg1”).innerHTML;
svgstr = document.getElementById(“svg1”).innerHTML;
document.getElementById(“t2”).value = document.getElementById(“svg1”).innerHTML;
document.getElementById(“t2”).focus();
document.getElementById(“t2”).select();
success = document.execCommand(“copy”);
}

function undo() {
document.getElementById(“svg1”).innerHTML = back;
document.getElementById(“t2”).value = document.getElementById(“svg1”).innerHTML;
document.getElementById(“t2”).focus();
document.getElementById(“t2”).select();
success = document.execCommand(“copy”);
}

function getCode() {
document.getElementById(“t2”).value = ‘<!DOCTYPE html> <html> <head> <title>Flower Generator</title> <style> #svg1{position: absolute; width: 100%; height: 100%; background:’ + document.getElementById(“clr1″).value + ‘} #g2 {transform:rotate(72deg)} #g3 {transform:rotate(144deg)} #g4 {transform:rotate(216deg)} #g5 {transform:rotate(288deg)} </style> <body><svg id=”svg1”>’ + document.getElementById(“svg1”).innerHTML + ‘</svg></body></html>’;
document.getElementById(“t2”).focus();
document.getElementById(“t2”).select();
success = document.execCommand(“copy”);
}
</script>

</body></html>

5 <g> elements are added to the svg element and each one contains 2 ellipses, one with no fill and one with no stroke:
<g id=”g1″>
<ellipse id=”e1″ rx=”0″ ry=”80″ fill = “none” stroke=”black” stroke-width= “3” />
<ellipse id=”e2″ rx=”0″ ry=”80″ fill=”#ffff99″ />
</g>

A final ellipse is then added for the center:
<ellipse id=”e11″ rx=”0″ ry=”40″ fill=”brown” />

With the exception of ther stroke, all the values will be changed:
for (var i = 1; i <= 11; i ++) {
document.getElementById(“e” + i).setAttribute(“cx”, posX);
document.getElementById(“e” + i).setAttribute(“cy”, posY – parseInt(l));
document.getElementById(“e” + i).setAttribute(“rx”, l2);
document.getElementById(“e” + i).setAttribute(“ry”, l);
if (i != 11) document.getElementById(“e” + i).setAttribute(“fill”, document.getElementById(“clr2”).value);
}
document.getElementById(“e11”).setAttribute(“rx”, l3);
document.getElementById(“e11”).setAttribute(“ry”, l3);
document.getElementById(“e11”).setAttribute(“cx”, posX + “px”);
document.getElementById(“e11”).setAttribute(“cy”, posY + “px”);

At this point the ellipses are all superimposed.
The flower is created by rotaring the <g> elements.
The rotation center is placed at the end of the ellipses and the rotation is set by the items of the array rot:
var rot = [“72deg”,”144deg”,”216deg”,”288deg”];
for (var i = 1; i <=5; i ++) {
document.getElementById(“g” + i).style.transformOrigin = str;
if (i > 1) document.getElementById(“g” + i).style.transform = “rotate(” + rot[i – 2] + “)”;
}

The undo is performed by creating a copy of the svg innerHTML before the new point is added:
back = document.getElementById(“svg1”).innerHTML;

Then clicking the Undo button calls the undo() function which copies the back string to the svg innerHTML
function undo() {
document.getElementById(“svg1”).innerHTML = back;
document.getElementById(“t2”).value = document.getElementById(“svg1”).innerHTML;
document.getElementById(“t2”).focus();
document.getElementById(“t2”).select();
success = document.execCommand(“copy”);
}

At each stage the code is placed in a text box and copied to the clipboard.

When the drawing is finished, double clicking the text box calls getCode():
function getCode() {
document.getElementById(“t2”).value = ‘<!DOCTYPE html> <html> <head> <title>Flower Generator</title> <style> #svg1{position: absolute; width: 100%; height: 100%; background:’ + document.getElementById(“clr1″).value + ‘} #g2 {transform:rotate(72deg)} #g3 {transform:rotate(144deg)} #g4 {transform:rotate(216deg)} #g5 {transform:rotate(288deg)} </style> <body><svg id=”svg1”>’ + document.getElementById(“svg1”).innerHTML + ‘</svg></body></html>’;
document.getElementById(“t2”).focus();
document.getElementById(“t2”).select();
success = document.execCommand(“copy”);
}

additional code is added to the front and back of the existing code.

HTML 5-Pointed Star Generator

This file creates custom 5 pointed stars at positions clicked on the screen, with the size fill and stroke adjustable. There is also an undo function to remoce the last star generated.
Here is an example:

starGenText

It is also possible to copy the information, paste into an editor and save the result as a html file.
This the html automatically created:
<!DOCTYPE HTML> <html> <head><title></title> <style> body{} </style> </head> <body> <svg id=”svg1″ style= “position: absolute; width: 100%; height: 800px; left: 0; top: 25px” > <polygon points=”552,183 247,183 494,362 400,73 305,362 ” style=”fill: none; stroke:#ff0000; stroke-width:4″></polygon><polygon points=”552,183 247,183 494,362 400,73 305,362 ” style=”fill: #a9ffff; stroke: none”></polygon><polygon points=”933,289 666,289 882,446 800,193 717,446 ” style=”fill: none; stroke:#0000c8; stroke-width:4″></polygon><polygon points=”933,289 666,289 882,446 800,193 717,446 ” style=”fill: #ffe1b4; stroke: none”></polygon> </svg></body></html>

and how it appears:

starGenText2

This is the code:

<!DOCTYPE html>
<html>
<head>
<title>Star Generator</title>
<style>
body {margin-left:0;margin-right:0;font:normal normal normal 15px Arial;}
a{ text-decoration: }:link { color: rgb(0, 0, 255) }:visited {color :rgb(100, 0,100) }:hover { }:active { }
svg{position: absolute; width: 100%; height: 800px; left: 0; top: 25px}
.d1{position: absolute; width: 1600px; height: 850px; left: 0; top: 25px}
</style>

</head>
<body>
<center><input type=”text” id=”t2″ style = “top: 0; width: 100px” value=”size” onclick=’document.getElementById(“t2”).value = “”;’ /> <input type=’color’ id=’color1′ value= #ffffff /> <input type=”text” id=”t3″ style = “top: 0; width:100px” value=”stroke size” onclick=’document.getElementById(“t3”).value = “”;’ /> <input type=’color’ id=’color2′ value= #000000 /> <input type=”button” id=”b1″ value=”Undo” onclick=’undo();’ /> <input type=”text” id=”t4″ style = “top: 0; width: 500px” value=”” ondblclick=’getCode();’/></center>
<div class=”d1″>
<svg width=”100%” height=”100%” >
<defs>
<pattern id=”smallGrid” width=”10″ height=”10″ patternUnits=”userSpaceOnUse”>
<path d=”M 10 0 L 0 0 0 10″ fill=”none” stroke=”gray” stroke-width=”0.5″/>
</pattern>
<pattern id=”grid” width=”100″ height=”100″ patternUnits=”userSpaceOnUse”>
<rect width=”100″ height=”100″ fill=”url(#smallGrid)”/>
<path d=”M 100 0 L 0 0 0 100″ fill=”none” stroke=”gray” stroke-width=”1″/>
</pattern>
</defs>

<rect width=”100%” height=”100%” fill=”url(#grid)” />
</svg>
</div>
<svg id = “canvas” ></svg>

<script type=’text/javascript’>
var ang = 0; var px = new Array(); var py = new Array(); var l = 100; var px0 = 300; var py0 = 300; var pts = “”; var sids = 0; var sw = 0; var k;
var posX;var posY; var prev = “”;
var IE = document.all?true:false;

document.getElementById(“canvas”).onclick = getMouse2;

function getMouse2(e) {
if (IE) {
posX = event.clientX + document.body.scrollLeft;
posY = event.clientY + document.body.scrollTop;
}
else {
posX = e.pageX -10;
posY = e.pageY + 45;
}
if (posY > 50) poly();
}

function poly() {
prev = document.getElementById(“canvas”).innerHTML;
px0 = posX + 10;
py0 = posY – 60;
sids = 5;
pts = “”;
l = parseInt(document.getElementById(“t2”).value);
var colr = document.getElementById(“color1”).value;
var strokecolor = document.getElementById(“color2”).value;
sw = 2* parseInt(document.getElementById(“t3”).value);
ang = parseInt(180/sids);
for (var j = 1;j <=sids; j ++) {
if (j == 1) k = j;
if (j == 2) k = 3;
if (j == 3) k = 5;
if (j == 4) k = 2;
if (j == 5) k = 4;
var dx = px0 + l * (Math.sin( (k * 360/sids + ang) * (Math.PI/180)));
var dy = py0 + l * (Math.cos( (k * 360/sids + ang) * (Math.PI/180)));
if (j > 0) {
px[j] =parseInt(dx);
py[j] = parseInt(dy);
}
pts = pts + px[j] + “,” + py[j] + ” ” ;
}

document.getElementById(“canvas”).innerHTML +='<polygon points=”‘ + pts + ‘” style=”fill: none; stroke:’ + strokecolor + ‘; stroke-width:’ + sw + ‘” />’;
document.getElementById(“canvas”).innerHTML +='<polygon points=”‘ + pts + ‘” style=”fill: ‘ + colr + ‘; stroke: none” />’;
if(pts != “”) {
document.getElementById(“t4”).value = document.getElementById(“canvas”).innerHTML;
document.getElementById(“t4”).focus();
document.getElementById(“t4”).select();
success = document.execCommand(“copy”);
}
}

function undo() {
document.getElementById(“canvas”).innerHTML = prev;
}

function getCode() {
prev = ‘<!DOCTYPE HTML> <html> <head><title></title> <style> body{} </style> </head> <body> <svg id=”svg1″ style= “position: absolute; width: 100%; height: 800px; left: 0; top: 25px” > ‘ + document.getElementById(“canvas”).innerHTML + ‘ </svg></body></html>’;
document.getElementById(“t4”).value = prev;
document.getElementById(“t4”).focus();
document.getElementById(“t4”).select();
success = document.execCommand(“copy”);
}
</script>
</body></html>

A grid is created to make it easier to position the stars:
<div class=”d1″>
<svg width=”100%” height=”100%” >
<defs>
<pattern id=”smallGrid” width=”10″ height=”10″ patternUnits=”userSpaceOnUse”>
<path d=”M 10 0 L 0 0 0 10″ fill=”none” stroke=”gray” stroke-width=”0.5″/>
</pattern>
<pattern id=”grid” width=”100″ height=”100″ patternUnits=”userSpaceOnUse”>
<rect width=”100″ height=”100″ fill=”url(#smallGrid)”/>
<path d=”M 100 0 L 0 0 0 100″ fill=”none” stroke=”gray” stroke-width=”1″/>
</pattern>
</defs>

<rect width=”100%” height=”100%” fill=”url(#grid)” />
</svg>
</div>

An onclick listener is created:
document.getElementById(“canvas”).onclick = getMouse2;

function getMouse2(e) {
if (IE) {
posX = event.clientX + document.body.scrollLeft;
posY = event.clientY + document.body.scrollTop;
}
else {
posX = e.pageX -10;
posY = e.pageY + 45;
}
if (posY > 50) poly();
}

The function poly() first sets up the parameters:
prev = document.getElementById(“canvas”).innerHTML;
px0 = posX + 10;
py0 = posY – 60;
sids = 5;
pts = “”;
l = parseInt(document.getElementById(“t2”).value);
var colr = document.getElementById(“color1”).value;
var strokecolor = document.getElementById(“color2”).value;
sw = 2* parseInt(document.getElementById(“t3”).value);
ang = parseInt(180/sids);

A normal loop would create a pentagon, so it has to be modified by creating a new variable,k.
for (var j = 1;j <=sids; j ++) {
if (j == 1) k = j;
if (j == 2) k = 3;
if (j == 3) k = 5;
if (j == 4) k = 2;
if (j == 5) k = 4;
var dx = px0 + l * (Math.sin( (k * 360/sids + ang) * (Math.PI/180)));
var dy = py0 + l * (Math.cos( (k * 360/sids + ang) * (Math.PI/180)));

Then an array od points is created:
var dx = px0 + l * (Math.sin( (k * 360/sids + ang) * (Math.PI/180)));
var dy = py0 + l * (Math.cos( (k * 360/sids + ang) * (Math.PI/180)));
if (j > 0) {
px[j] =parseInt(dx);
py[j] = parseInt(dy);
}
pts = pts + px[j] + “,” + py[j] + ” ” ;

The star is then drawn and the code for the polygon placed in a text box, with its contents copied to the clipboard:
document.getElementById(“canvas”).innerHTML +='<polygon points=”‘ + pts + ‘” style=”fill: none; stroke:’ + strokecolor + ‘; stroke-width:’ + sw + ‘” />’;
document.getElementById(“canvas”).innerHTML +='<polygon points=”‘ + pts + ‘” style=”fill: ‘ + colr + ‘; stroke: none” />’;
if(pts != “”) {
document.getElementById(“t4”).value = document.getElementById(“canvas”).innerHTML;
document.getElementById(“t4”).focus();
document.getElementById(“t4”).select();
success = document.execCommand(“copy”);

Generating a star with a border is unsatisfactory, since the stroke will continue through the center.
The workaround is to draw it twice, once with no fill and once with no stroke. That was the fill od the second hides the interior stroke of the first:
document.getElementById(“canvas”).innerHTML +='<polygon points=”‘ + pts + ‘” style=”fill: none; stroke:’ + strokecolor + ‘; stroke-width:’ + sw + ‘” />’;
document.getElementById(“canvas”).innerHTML +='<polygon points=”‘ + pts + ‘” style=”fill: ‘ + colr + ‘; stroke: none” />’;

The process can be repeated to add more stars.

When the desired number of stars is inserted, double clicking the text box adds html code and again copies the contents to the clipboard:
function getCode() {
prev = ‘<!DOCTYPE HTML> <html> <head><title></title> <style> body{} </style> </head> <body> <svg id=”svg1″ style= “position: absolute; width: 100%; height: 800px; left: 0; top: 25px” > ‘ + document.getElementById(“canvas”).innerHTML + ‘ </svg></body></html>’;
document.getElementById(“t4”).value = prev;
document.getElementById(“t4”).focus();
document.getElementById(“t4”).select();
success = document.execCommand(“copy”);
}

The previous step is undone with the function undo():
function undo() {
document.getElementById(“canvas”).innerHTML = prev;

Using YRotation to give depth to images

This post uses the rotateY transform to create a 3 dimensional effect from an image. This is a bare bones app in which I someday may eleborate to make it more customizable.

This is the code:

<!DOCTYPE html>
<html>
<head>
<title>Wobble</title>
<style>
body {margin-left:0;margin-right:0;font:normal normal normal 15px Arial; background: #aaaaaa}
a{ text-decoration: }:link { color: rgb(0, 0, 255) }:visited {color :rgb(100, 0,100) }:hover { }:active { }

</style>
</head>
<body>
<img id=”im1″ src = “A-E/Bizzarri.png” style=”position: absolute; left: 50%; top: 50%; transform: -webkit-rotateY(5deg)” />
<script>
var si; var cnt = 0; var rotat;
document.getElementById(“im1”).style.marginLeft = (-1 * im1.clientWidth / 2) + “px”;
document.getElementById(“im1”).style.marginTop = (-1 * im1.clientHeight / 2) + “px”;
setTimeout(“st()”,200);
function st() {
rotat = (14 * (400 / im1.clientWidth)) + “deg”;
setInterval(“rot()”,200);
}
function rot() {
cnt ++;
if (cnt % 2 == 1) {
document.getElementById(“im1”).style.transform = “webkitRotateY(” + rotat+ “)”;
document.getElementById(“im1”).style.transform = “rotateY(” + rotat + “)”;
} else {
document.getElementById(“im1”).style.transform = “webkitRotateY(0deg)”;
document.getElementById(“im1”).style.transform = “rotateY(0deg)”;
}
}
</script>
</body></html>

I have centered the image both horizontally and vertically by setting the width and height to 50% and using the following to set the margins:
document.getElementById(“im1”).style.marginLeft = (-1 * im1.clientWidth / 2) + “px”;
document.getElementById(“im1”).style.marginTop = (-1 * im1.clientHeight / 2) + “px”;

I have also made the y rotation dependent on the image width so that the linear effect is not greater for wide images:
rotat = (14 * (400 / im1.clientWidth)) + “deg”;

This is then used in the function rot():
setInterval(“rot()”,200);

function rot() {
cnt ++;
if (cnt % 2 == 1) {
document.getElementById(“im1”).style.transform = “webkitRotateY(” + rotat+ “)”;
document.getElementById(“im1”).style.transform = “rotateY(” + rotat + “)”;
} else {
document.getElementById(“im1”).style.transform = “webkitRotateY(0deg)”;
document.getElementById(“im1”).style.transform = “rotateY(0deg)”;
}
}