A Dropdown Form

Forms traditionally are entered as blocks. Unfortunately that often takes a lot of the page space.

This post describes a vertical dropdown form which can be exposed only when needed.

Here is a picture of how it might work:

DropdownFormText


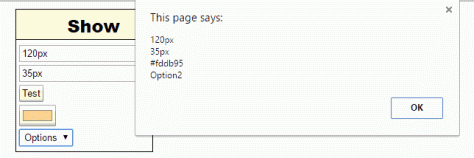
This simple example only displays the values in the form elements, but of course much more can be done.

This picture shows the addition of a file input:

DropdownFormTest

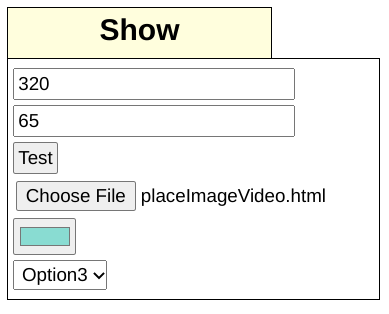
As can be seen there are only 6 elements, but even that number placed horizontally in a header would take much of the width.

Click to Try

This is the code:

 
  <!DOCTYPE html PUBLIC “-//W3C//DTD XHTML 1.0 Transitional//EN” “http://www.w3.org/TR/xhtml1/DTD/xhtml1-transitional.dtd”&gt;
  <html xmlns=”http://www.w3.org/1999/xhtml“>
  <head profile=”http://gmpg.org/xfn/11“>
  <title>HTML Editor</title>
  <style>
  body {margin-left:0;margin-right:0;font:normal normal 800 24px Arial;}
  a{ text-decoration: }:link { color: rgb(0, 0, 255) }:visited {color :rgb(100, 0,100) }:hover { }:active { }
  #d2 {position: absolute; left: 300px; top: 10px; border: 1px solid; width: 200px; height: 30px; padding:5px; background:#fffedd; text-align: center}
  #d3 {position: absolute; left: 300px; top: 51px; border: 1px solid; visibility:hidden; padding: 5px 2px }
  input, #s1 {padding: 2px; margin: 2px}
  </style>
  </head>
  <body>
  <div id=”d2onmouseover = ‘go();‘ >Show</div>
  <div id=”d3“>
  <input type=”textid=”t2name=”t2value=”” placeholder=”width“/><br />
  <input type=”textid=”t3name=”t3value=”” placeholder=”height“/><br />
  <input type=”buttonid=”b1name=”b1value=”Test” /><br />
  <input type=”fileid=”filname=”files” /><br />
  <input type=’colorid=’clrvalue= “simple color” /><br />
  <select id=”s1name=”s1onchange=’actn();‘>
  <option >Options</option>
  <option >Option1</option>
  <option >Option2</option>
  <option >Option3</option>
  <option >Option4</option>
  <option >Option5</option>
  </select>
  </div>
   
   
  <script type=”text/javascript“>
   
  function go() {
  document.getElementById(“d3”).style.visibility = “visible”;
  }
   
  function actn() {
  document.getElementById(“d3”).style.visibility = “hidden”;
  alert(document.getElementById(“t2”).value + “\n” + document.getElementById(“t3”).value + “\n” + document.getElementById(“clr”).value + “\n” + document.getElementById(“s1”).value );
  }
  </script>
 

</body></html>

This is a simple app with one function to show the menu and one to display an alert with the input values as well as hiding the menu.

The dropdown menu is played by a mouseover.

A Font Width Calculator

This app takes the font data and calculates an average character width, which is placed on the clipboard and can be pasted into another file to determine the width of an element necessary to contain a string with that font.

It does this by getting the  client width of a hidden layer that contains all the alphabet letters as well as five spaces and divides by the number of characters.

Click to Try

This is the code:

<!DOCTYPE html PUBLIC “-//W3C//DTD XHTML 1.0 Transitional//EN” “http://www.w3.org/TR/xhtml1/DTD/xhtml1-transitional.dtd”&gt;
<html xmlns=”http://www.w3.org/1999/xhtml”&gt;
<head profile=”http://gmpg.org/xfn/11″&gt;
<title>Font Width</title>
<style>
@font-face { font-family: ‘Cancun’;
src: url(‘cancunn-webfont.eot’),
url(‘cancunn-webfont.woff’) format(‘woff’),
url(‘cancunn-webfont.ttf’) format(‘truetype’),
url(‘cancunn-webfont.svg#CancunPlain’) format(‘svg’);
font-weight: normal;
font-style: normal;
}
body {margin-left:0;margin-right:0;font:normal normal normal 15px Arial; white-space:pre-wrap}
a{ text-decoration: }:link { color: rgb(0, 0, 255) }:visited {color :rgb(100, 0,100) }:hover { }:active { }

</style>
</head>
<body>
<div id=”d1″ style=”position: absolute; font-size: 18px; font-family: Arial Black; visibility: hidden”></div>

<input type=”button” id=”b1″ name=”b1″ value=”Go” onclick=’showWidth();’/> <select id=”s1″ name=”s1″>
<option>Arial</option>
<option>Arial Black</option>
<option>Times New Roman</option>
<option>Comic Sans MS</option>
<option>Verdana</option>
<option>Georgia</option>
<option>Cancun</option>
</select>
<input type=”checkbox” id=”ch1″ name=”ch1″ value=” ” />Italic <input type=”text” id=”weight” name=”weight” value=”” placeholder=”weight” /> <input type=”text” id=”fontsize” name=”fontsize” value=”” placeholder=”font-size – px” /> <input type=”text” id=”fsize” name=”fsize” value=”” />

<script type=”text/javascript”>
var w1; var w2; var cnt = 0;
function showWidth() {
cnt ++;
document.getElementById(“d1”).style.fontFamily = document.getElementById(“s1”).value;
if (document.getElementById(“ch1”).checked) {
document.getElementById(“d1”).style.fontStyle = “italic”;
} else {
document.getElementById(“d1”).style.fontStyle = “normal”;
}
document.getElementById(“d1”).style.fontSize = document.getElementById(“fontsize”).value + “px”;
document.getElementById(“d1”).style.fontWeight = document.getElementById(“weight”).value;
document.getElementById(“d1”).innerHTML = “abcde fghij klmno pqrst uvwxyz”;
document.getElementById(“fsize”).value = (document.getElementById(“d1”).clientWidth /30).toFixed(2);
document.getElementById(“fsize”).focus();
document.getElementById(“fsize”).select();
success = document.execCommand(“copy”);
}
</script>
</body></html>

The function showWidth() does the calculation.

It gets the values and sets them for the hidden layer d1.

The innerHTML is then set to the following string: document.getElementById(“d1”).innerHTML = “abcde fghij klmno pqrst uvwxyz”;

The average font width is then calculated:

document.getElementById(“fsize”).value = (document.getElementById(“d1”).clientWidth /30).toFixed(2);

This is then placed on the clipboard:

document.getElementById(“fsize”).focus();
document.getElementById(“fsize”).select();
success = document.execCommand(“copy”);

There are a few new things form what I had done previously, particularly, the sample string contains about 1 space for each five characters simulating five letter words.

App to interactively position and size images on web page

This app loads images and allows you to position and size them interactively.

To use:  load the image from the select element, choose a height as a fraction of the screen height, enter a unique id number and double click the id box to load the image with the chosen height.

It can be moved simply by clicking the screen where you want to place it.

To resize, enter a new fractional height and double click the box.

A new image can be added by choosing it, setting its height and giving it a new id number.

Either image can be moved or resized by putting its id number in the appropriate box.

In this way the images can be placed on the screen at any desired place and size.

Click to Try

This is the code:

<!DOCTYPE html PUBLIC “-//W3C//DTD XHTML 1.0 Transitional//EN” “http://www.w3.org/TR/xhtml1/DTD/xhtml1-transitional.dtd”&gt;
<html xmlns=”http://www.w3.org/1999/xhtml”&gt;
<head profile=”http://gmpg.org/xfn/11″&gt;
<title>Place Image</title>
<style>
body {margin-left:0;margin-right:0;font:normal normal normal 15px Arial;}
a{ text-decoration: }:link { color: rgb(0, 0, 255) }:visited {color :rgb(100, 0,100) }:hover { }:active { }
#s1{position: relative; top: 0;left: 0;}
#t1{position: relative; top: 0;left: 10px;}
#t2{position: relative; top: 0;left: 10px; width: 60px}
#t3{position: relative; top: 0;left: 10px; width: 60px}
</style>
</head>
<body>
<select id=”s1″ name=”s1″>
<option >Choose Image</option>
<option >SAG.png</option>
<option >Camel2009.jpg</option>
</select>
<input type=”text” id=”t1″ name=”t1″ value=”” placeholder=”height; screen fraction” />
<input type=”text” id=”t2″ name=”t2″ value=”” placeholder=”id #” ondblclick=’drw();’ />
<input type=”text” id=”t3″ name=”t3″ value=”” placeholder=”Resize” ondblclick=’rsize();’ />
<div id=”frame” style=”position: absolute; width: 100%; height: 100%; top: 45px”></div>

<script type=”text/javascript”>
var ht; var posX; var posY; var idno; var fil; var ht2;
document.onclick= mov;

function mov(e) {
posX = e.pageX;
posY = e.pageY – 45;
if (posY > 5) {
idno = document.getElementById(“t2”).value;
document.getElementById(“im” + idno).style.top = posY + “px”;
document.getElementById(“im” + idno).style.left = posX + “px”;
}
}

function drw() {
idno = document.getElementById(“t2”).value;
fil = document.getElementById(“s1”).value;
ht = parseFloat(document.getElementById(“t1”).value);
document.getElementById(“frame”).innerHTML += ‘<img id=”im’ + idno + ‘” src=”‘ + fil + ‘” height = “‘ + (screen.height * ht) + ‘px” />’;
document.getElementById(“im” + idno).style.position = “absolute”;
document.getElementById(“im” + idno).style.top = “10px”;
document.getElementById(“im” + idno).style.left = “10px”;
}

function rsize() {
idno = document.getElementById(“t2”).value;
ht2 = ht = parseFloat(document.getElementById(“t3”).value);
document.getElementById(“im” + idno).style.height = (screen.height * ht) + “px”;
}

</script>
</body></html>

The function drw() loads the images:

function drw() {
idno = document.getElementById(“t2”).value;
fil = document.getElementById(“s1”).value;
ht = parseFloat(document.getElementById(“t1”).value);
document.getElementById(“frame”).innerHTML += with the file information
document.getElementById(“im” + idno).style.position = “absolute”;
document.getElementById(“im” + idno).style.top = “10px”;
document.getElementById(“im” + idno).style.left = “10px”;
}

The HTML of the “frame” layer is appended with the information supplied for the image and with the placement set.:

The image is moved by clicking the screen:

document.onclick= mov;

function mov(e) {
posX = e.pageX;
posY = e.pageY – 45;
if (posY > 5) {
idno = document.getElementById(“t2”).value;
document.getElementById(“im” + idno).style.top = posY + “px”;
document.getElementById(“im” + idno).style.left = posX + “px”;
}
}

The position is reset for the chosen image:

idno = document.getElementById(“t2”).value;
document.getElementById(“im” + idno).style.top = posY + “px”;
document.getElementById(“im” + idno).style.left = posX + “px”;

A chosen image is resized with the function rsize():

function rsize() {
idno = document.getElementById(“t2”).value;
ht2 = ht = parseFloat(document.getElementById(“t3”).value);
document.getElementById(“im” + idno).style.height = (screen.height * ht) + “px”;
}

the new size is set for the chosen image:

document.getElementById(“im” + idno).style.height = (screen.height * ht) + “px”;

Using Select Elements to Provide Links to Web Pages

Links are generally provided by anchor tags which are either used directly or placed in flyout layers.

It might be more convenient to use the options of a select element to provide the links.

Click to Try

Here is the code:

<!DOCTYPE html PUBLIC “-//W3C//DTD XHTML 1.0 Transitional//EN” “http://www.w3.org/TR/xhtml1/DTD/xhtml1-transitional.dtd”&gt;
<html xmlns=”http://www.w3.org/1999/xhtml”&gt;
<head profile=”http://gmpg.org/xfn/11″&gt;
<title>New URL</title>
<style>
body {margin-left:0;margin-right:0;font:normal normal normal 15px Arial;}
a{ text-decoration: }:link { color: rgb(0, 0, 255) }:visited {color :rgb(100, 0,100) }:hover { }:active { }

</style>
</head>
<body>
<select id=”s1″ name=”s1″ onchange=’openNewPage(document.getElementById(“s1″).value,”_blank” )’ >
<option >Choose URL – New Tab</option>
<option >resizeTA.html</option>
<option >gradbks2.html</option>
</select> <select id=”s2″ name=”s2″ onchange=’openNewPage(document.getElementById(“s2″).value,”_self” )’ >
<option >Choose URL – Same Tab</option>
<option >resizeTA.html</option>
<option >gradbks2.html</option>
</select>
<script type=”text/javascript”>
var url;

function openNewPage(url,wndow ) {
var win=window.open(url, wndow);
win.focus();
document.getElementById(“s1”).value = “Choose URL – New Tab”;
document.getElementById(“s2”).value = “Choose URL – Same Tab”;
}
</script>
</body></html>

Changing the value of the select calls a function with parameters:

<select id=”s1″ name=”s1″ onchange=’openNewPage(document.getElementById(“s1″).value,”_blank” )’ >

<option >Choose URL – New Tab</option>
<option >imageReplace2.html</option>
<option >gradbks2.html</option>

There is also a second select with the same menu items but which opens the new page in the current window:

onchange=’openNewPage(document.getElementById(“s2″).value,”_self” )’

function openNewPage(url,wndow ) {
var win=window.open(url, wndow);
win.focus();
document.getElementById(“s1”).value = “Choose URL – New Tab”;
document.getElementById(“s2”).value = “Choose URL – Same Tab”;
}

The function opens the page designated by the option in either the same  window or new tab.

It additionally returns the select value to the heading.