A Duplicate Birthday Calculator

I was intrigued by the game often done ar parties, where they check to see if two people have the same birthday, so I wrote this app to do the calculation. I also added a calculation to give the probability that someone else would specifically have your birthday, which is much lower.
I cut off the calculation at a 90% match, but also made a color change when the probability exceeded 50%.

Here is a calculation at an early stage:

dupBDayText

and at a later stage:

dupBDayText2

Notice that the specific match requires many more tries.

This is the code:

<!DOCTYPE html>
<html>
<head>
<title>Duplicate Birthdays</title>
<style>
body {margin-left:0;margin-right:0;font:normal normal normal 15px Arial;}
a{ text-decoration: }:link { color: rgb(0, 0, 255) }:visited {color :rgb(100, 0,100) }:hover { }:active { }
</style>
</head>
<body>
<center> <input type=”text” id = “t1″ style=”color:white;background:black;font:normal normal 600 18px Arial” value = “” /> <select id=”s1″ size = “2” onclick=’strt();’><option>Any Match</option><option>Specific Match</option></select> <input type=”button” id=”b1″ value=”New” onclick=’nw();’ /></center>
<script>
var1 = 365; var2 = var1 – 1; var res = 1; var cnt = 0; var si; var ival;

function nw() {
clearInterval(si);
document.getElementById(“t1”).value = “”;
cnt = 0;
var1 = 365;
var2 = var1 – 1;
res = 1;
document.getElementById(“t1”).style.color = “white”;
}
function strt() {
if(document.getElementById(“s1”).value == “Any Match”) ival = 1000;
if(document.getElementById(“s1”).value == “Specific Match”) ival = 500;
si = setInterval(“calc()”, ival);
}

function calc() {
cnt ++;
res *= var2/var1;
document.getElementById(“t1″).value = cnt + ” ” + (100 * (1 – res)).toFixed(2) + “%”;
if (res <= .5) document.getElementById(“t1”).style.color = “#ffff66”;
if (res <= .1) {
clearInterval(si);
}
if(document.getElementById(“s1”).value == “Any Match”) var2 –;
}
</script>
</body></html>

I used the onclick property of a select element to start the calculation by calling strt():
function strt() {
if(document.getElementById(“s1”).value == “Any Match”) ival = 1000;
if(document.getElementById(“s1”).value == “Specific Match”) ival = 500;
si = setInterval(“calc()”, ival);
}

Since it takes many more tries to get a specific match, I chose a shorter interval for that.

The setInterval function calls calc():
function calc() {
cnt ++;
res *= var2/var1;
document.getElementById(“t1″).value = cnt + ” ” + (100 * (1 – res)).toFixed(2) + “%”;
if (res <= .5) document.getElementById(“t1”).style.color = “#ffff66”;
if (res <= .1) {
clearInterval(si);
}
if(document.getElementById(“s1”).value == “Any Match”) var2 –;
}

the variable cnt is the number of tries and is incremented each call:
cnt ++;

there are two variables var1 & var2 that determine the probability given by the variabler res:
res *= var2/var1;

The result is added to a text box and converted to a % probability:
document.getElementById(“t1″).value = cnt + ” ” + (100 * (1 – res)).toFixed(2) + “%”;

If res is less than .5 the color is changed to show that the probability is greater than 50%, and if .1 or less the calculation is stopped:
if (res <= .5) document.getElementById(“t1”).style.color = “#ffff66”;
if (res <= .1) {
clearInterval(si);
}

There is also a New button to reset for a new calculation:
clearInterval(si);
document.getElementById(“t1”).value = “”;
cnt = 0;
var1 = 365;
var2 = var1 – 1;
res = 1;
document.getElementById(“t1”).style.color = “white”;
}
Filtering Images in Canvas – Update

This is an update of the image in canvas editor. It has adjustments for choosing images, image sizing, filters ready to just fill in, and replacing the background with a solid color.
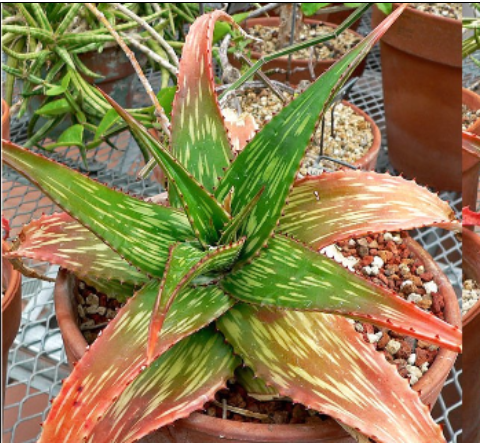
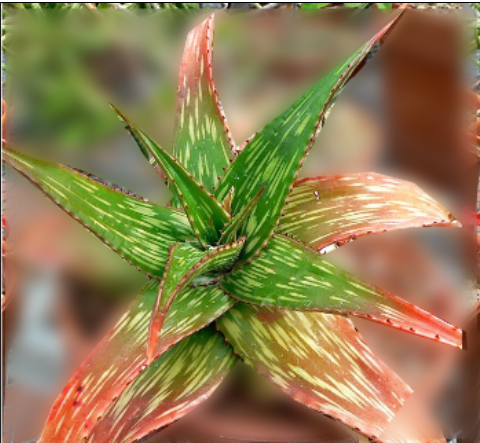
Here are spme examples:

canvasPath2Text

Original

canvasPath2Text2

Blurred Background

canvasPath2Text3

Solid Background

This is the code:

<!DOCTYPE html>
<html>
<body>
<center><input type=”file” id=”files” value = “” /> <input type=”text” id=”t5″ style=”position: absolute; left: 227px; width: 176px” value=”” /> <input type=”text” id = “t2” value = “” /> <input type=”text” id = “t4” style = “width:100px” value = “” placeholder=”img Height”/> <input type=”text” id=”t1″ value = “blur( ) brightness( ) contrast() grayscale(0%) hue-rotate( ) opacity( ) saturate( ) sepia(0%)” /> <input type=”text” id = “t3” style = “width:100px” value = “” placeholder=”Bk Color”/> <select id=”s1″ onchange=’ctrl();’><option>Choose</option><option>Start</option><option>Done</option><option></option><option>A-E/</option><option>F-J/</option><option>K-O/</option><option>P-R/</option><option>S-T/</option></select> <input type=”button” id=”b1″ value=”Change Filter” onclick=’chng();’ /></center>
<div id=”frame” style = “position: absolute; width: 100%; height: 100%; left: 0; top:50px”></div>


<script>
var c; var img; var ctx; var posx; var posy; var first = true; var pth = “”; var fldr = “”; var foldr = false;

function ld() {
document.getElementById(“frame”).innerHTML = ‘<img id = “image1” src=”‘ + document.getElementById(“t5″).value + ‘” style=”position: absolute; visibility: hidden; height:’ + document.getElementById(“t4″).value + ‘px” />’;
img = document.getElementById(“image1”);
var ht = img.height;
var wd = img.width;
document.getElementById(“frame”).innerHTML += ‘<canvas id = “canvas” style = “position: absolute; top: 0; left: 0; border: 1px solid”; />’;
c = document.getElementById(“canvas”);
ctx = c.getContext(“2d”);
img.height = ht;
img.width = wd;
c.height = ht;
c.width = wd;
}

document.onclick = getPoints;

function getPoints(e) {
posx = e.pageX;
posy = e.pageY;
if (posy >= 50) {
if (first) {
ctx.moveTo(posx,posy – 50);
document.getElementById(“t2”).value += “ctx.moveTo(” + posx + “,” + (posy – 50) + “);”;
first = false;
}
if (!first) {
ctx.lineTo(posx,posy – 50);
document.getElementById(“t2”).value += “ctx.lineTo(” + posx + “,” + (posy – 50) + “);”;
}
}
}

function ctrl() {
if (document.getElementById(“s1”).value == “Start”) start();
if (document.getElementById(“s1”).value == “Done”) cont();

if (document.getElementById(“s1”).value == “” ||(document.getElementById(“s1”).value.indexOf(“\/” != -1 ) && ! foldr)) {
fldr = document.getElementById(“s1”).value;
var fil = document.getElementById(“files”).value;
if (fil.indexOf(“fake”) > 0) fil = fil.substr(12, fil.length – 12);
fil = fldr + fil;
document.getElementById(“t5”).value = fil;
foldr = true;
ld();
}
document.getElementById(“s1”).value = “Choose”;
}


function start() {
c.remove();
ld();
ctx.drawImage(img,0,0,img.width, img.height);
ctx.filter = document.getElementById(“t1”).value;
ctx.beginPath();
document.getElementById(“t2”).value = “ctx.beginPath();”;
}

function cont() {
ctx.closePath();
document.getElementById(“t2”).value += “ctx.closePath();”;
if (document.getElementById(“t3”).value != “”) {
ctx.fillStyle = document.getElementById(“t3”).value;
ctx.fillRect(0, 0, c.width, c.height);
}
chng();
}

function chng() {
c.remove();
ld();
ctx.drawImage(img,0,0,img.width, img.height);
ctx.filter = document.getElementById(“t1”).value;
eval(document.getElementById(“t2”).value);
if (document.getElementById(“t3”).value != “”) {
ctx.fillStyle = document.getElementById(“t3”).value;
ctx.fillRect(0, 0, c.width, c.height);
}
ctx.clip();
ctx.drawImage(img,0,0,img.width, img.height);
}

</script>

</body>
</html>

The function ctrl() called by the select element directs the operation to perform:
function ctrl() {
if (document.getElementById(“s1”).value == “Start”) start();
if (document.getElementById(“s1”).value == “Done”) cont();

if (document.getElementById(“s1”).value == “” ||(document.getElementById(“s1”).value.indexOf(“\/” != -1 ) && ! foldr)) {
fldr = document.getElementById(“s1”).value;
var fil = document.getElementById(“files”).value;
if (fil.indexOf(“fake”) > 0) fil = fil.substr(12, fil.length – 12);
fil = fldr + fil;
document.getElementById(“t5”).value = fil;
foldr = true;
ld();
}
document.getElementById(“s1”).value = “Choose”;
}

First I file is chosen and then its path.
Its size, filters and background color can be set.
Clicking Start calls start():
function start() {
c.remove();
ld();
ctx.drawImage(img,0,0,img.width, img.height);
ctx.filter = document.getElementById(“t1”).value;
ctx.beginPath();
document.getElementById(“t2”).value = “ctx.beginPath();”;
}


The path is traced and when completed, Done is selected and calls cont():
function cont() {
ctx.closePath();
document.getElementById(“t2”).value += “ctx.closePath();”;
if (document.getElementById(“t3”).value != “”) {
ctx.fillStyle = document.getElementById(“t3”).value;
ctx.fillRect(0, 0, c.width, c.height);
}
chng();
}

This function ends by calling chng(), which instantly displays the edited image:
function chng() {
c.remove();
ld();
ctx.drawImage(img,0,0,img.width, img.height);
ctx.filter = document.getElementById(“t1”).value;
eval(document.getElementById(“t2”).value);
if (document.getElementById(“t3”).value != “”) {
ctx.fillStyle = document.getElementById(“t3”).value;
ctx.fillRect(0, 0, c.width, c.height);
}
ctx.clip();
ctx.drawImage(img,0,0,img.width, img.height);
}

The canvas has to be removed and recreated for the effects to be displayed, so :
c.remove();
ld();
are called.

For the background blur, the path selects the background.
For the solid background, the foreground is selected.

Filtering Images in Canvases

I had previously shown how clip path could be used to edit images in divisions.
Embedding images in canvases is much more versatile This only scratches the surface, with only one image that can be used.
Further posts will greatly enhance the process.

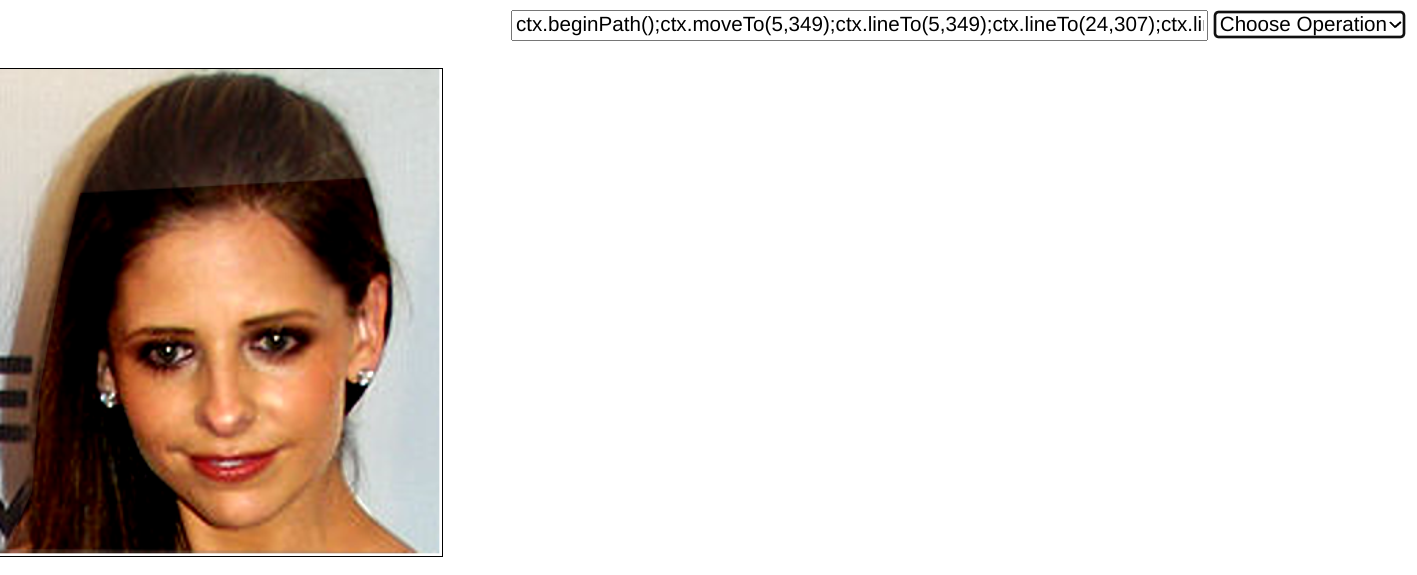
This is an example with the image that had been used with the CSS clip path:

canvasPathText

This is how it looked before placing the image in the canvas:

canvasPathText2

This example used only contrast(150%) as a filter, but many other filters or combinations could have been used.

This is the code:

<!DOCTYPE html>
<html>
<body>
<img id = “image1″ src=”S-T/SAG.png” style=”position: absolute; visibility: hidden;width:322px” />
<center><input type=”text” id=”t1″ style=”width: 500px” value = “” placeholder=”Filter” /> <select id=”s1″ onchange=’ctrl();’><option>Choose Operation</option><option>Start</option><option>Done</option></select></center>
<canvas id=”canvas” style=”position: absolute;top:50px; border: 1px solid; left: 0″></canvas>

<script>
var c = document.getElementById(“canvas”); var img = document.getElementById(“image1”); var ctx = c.getContext(“2d”); var posx; var posy; var first = true;

c.width = img.width;
c.height = img.height;

document.onclick = getPoints;

function getPoints(e) {
posx = e.pageX;
posy = e.pageY – 50;
if (posy >= 50) {
if (first) {
ctx.moveTo(posx,posy);
document.getElementById(“t1”).value += “ctx.moveTo(” + posx + “,” + posy + “);”;
first = false;
}
if (!first) {
ctx.lineTo(posx,posy);
document.getElementById(“t1”).value += “ctx.lineTo(” + posx + “,” + posy + “);”;
}
}
}

function ctrl() {
if (document.getElementById(“s1”).value == “Start”) start();
if (document.getElementById(“s1”).value == “Done”) cont();

document.getElementById(“s1”).value = “Choose Operation”;
}

function start() {
ctx.drawImage(img,0,0);
ctx.filter = document.getElementById(“t1”).value;
ctx.beginPath();
document.getElementById(“t1”).value = “ctx.beginPath();”;
}

function cont() {
ctx.closePath();
document.getElementById(“t1”).value += “ctx.closePath();”;
ctx.clip();
//ctx.filter = document.getElementById(“t1”).value;
ctx.drawImage(img,0,0);
}

</script>

</body>
</html>

The image must be loaded before the canvas, but it must be hidden before it can be placed in the image, because its constant presence would disrupt the effect.
How it can be made into an image object:
var img = document.getElementById(“image1”);

A canvas element must also be created:
<canvas id=”canvas” style=”position: absolute;top:50px; border: 1px solid; left: 0″></canvas>
var c = document.getElementById(“canvas”);

A canvas context must be obtained:
var ctx = c.getContext(“2d”);

There is also an onclick listener to place the points that will make tghe path:
document.onclick = getPoints;

function getPoints(e) {
posx = e.pageX;
posy = e.pageY – 50;
if (posy >= 50) {
if (first) {
ctx.moveTo(posx,posy);
document.getElementById(“t1”).value += “ctx.moveTo(” + posx + “,” + posy + “);”;
first = false;
}
if (!first) {
ctx.lineTo(posx,posy);
document.getElementById(“t1”).value += “ctx.lineTo(” + posx + “,” + posy + “);”;
}
}
}

Changing the select calls the function ctrl().

Depending on the value of the select, either start() or cont() is called.
function start() {
ctx.drawImage(img,0,0);
ctx.filter = document.getElementById(“t1”).value;
ctx.beginPath();
document.getElementById(“t1”).value = “ctx.beginPath();”;
}

function cont() {
ctx.closePath();
document.getElementById(“t1”).value += “ctx.closePath();”;
ctx.clip();
ctx.drawImage(img,0,0);
}

Start deaws the image into the canvas:
ctx.drawImage(img,0,0);
applies the filter:
ctx.filter = document.getElementById(“t1”).value;
starts the path and places the starting code in the text box in which the filter was entered:
ctx.beginPath();
document.getElementById(“t1”).value = “ctx.beginPath();”;

After the path has been traced, cont() completes the path:
ctx.closePath();
makes it into a clip path:
ctx.clip();
and draws the image that will be clipped:
ctx.drawImage(img,0,0);

So what has happened is there are two embedded images, the lower one is untouched but the upper one is both filtered and clipped, so the part inside the clip is filtered, while the original shows through the part that is hidden by the clip.

Every srep of the path is printed inthe text box.

The points set by getPoints(e) is fairly standard with one exception:
The first click adds moveTo while all subsequent clicks add lineTo. This is handled in the following manner:
A boolean variable first is set to true.
The following is then used:
if (first) {
ctx.moveTo(posx,posy);
document.getElementById(“t1”).value += “ctx.moveTo(” + posx + “,” + posy + “);”;
first = false;
}
if (!first) {
ctx.lineTo(posx,posy);
document.getElementById(“t1”).value += “ctx.lineTo(” + posx + “,” + posy + “);”;
}
As I said this barely the beginning. There is much more to come later.

Create and Load JS Files On-the-Fly

I use js files for databases. This app a;lows thecreation and loading of js files on-the fly.

This is an example of the data being displayed in a textarea:

CreateJSDatabaseText

This is the code.
<!DOCTYPE html>
<html>
<head>
<title>Create JS</title>
<style>
body {margin-left:0;margin-right:0;font:normal normal normal 15px Arial;}
a{ text-decoration: }:link { color: rgb(0, 0, 255) }:visited {color :rgb(100, 0,100) }:hover { }:active { }
textarea {position: absolute; width: 100%; height: 100%; top:50px; padding: 10px}
</style>
<body>
<center><input type =”text” id= “t1” value = “” placeholder = “Item to Add” /> <input type=”button” id=”b1″ value = “Save” onclick=’sve();’ /></center>
<textarea id=”ta”></textarea>
<script>
var created = false; var textToSave = “”; var oldURL = “demo.js”; var arr = []; var iniStr; var arr = []; var cnt = -2;

let el = document.createElement(“script”);
el.setAttribute(“src”, “demo.js”);
el.setAttribute(“type”, “text/javascript”);
document.body.appendChild(el);

setTimeout(“display()”,500);

function display() {
if (created) {
for (var i = 0; i < arr.length; i ++) {
document.getElementById(“ta”).value += arr[i] + “\n”;
}
}
if (! created) sve();
}


function sve() {
cnt ++;
iniStr = ‘created = true; cnt = ‘ + cnt + ‘;’;
textToSave = iniStr + ‘\n’;
var fileNameToSaveAs = “demo.js”;

if(created) {
if (document.getElementById(“t1”).value != “”){
arr[cnt] = document.getElementById(“t1”).value;
if (arr[cnt].indexOf(‘”‘ == -1)) arr[cnt] = parseFloat(eval(arr[cnt]));

for (var i = 0; i < cnt; i ++) {
if (isNaN(parseFloat(arr[i]))) arr[i] = ‘”‘ + arr[i] + ‘”‘;
textToSave += ‘arr[‘ + i + ‘] = ‘ + arr[i] + ‘;\n’;
}
}
textToSave += ‘arr[‘ + cnt + ‘] = ‘ + arr[cnt] + ‘;\n’;
}
alert(textToSave);
var textToSaveAsBlob = new Blob([textToSave], {type:”text/plain”});
var textToSaveAsURL = window.URL.createObjectURL(textToSaveAsBlob);
oldURL = fileNameToSaveAs;
var downloadLink = document.createElement(“a”);
downloadLink.download = fileNameToSaveAs;
downloadLink.innerHTML = “Download File”;
downloadLink.href = textToSaveAsURL;
downloadLink.onclick = destroyClickedElement;
downloadLink.style.display = “none”;
document.body.appendChild(downloadLink);
downloadLink.click();
}

function destroyClickedElement(event) {
document.body.removeChild(event.target);
setTimeout(“location.reload()”,20000);
}

</script>
</body></html>

let el = document.createElement(“script”);
el.setAttribute(“src”, “demo.js”);
el.setAttribute(“type”, “text/javascript”);
document.body.appendChild(el);

setTimeout(“display()”,500);

function display() {
if (created) {
for (var i = 0; i < arr.length; i ++) {
document.getElementById(“ta”).value += arr[i] + “\n”;
}
}
if (! created) sve();
}

The first lines of code load the js file, if it exists. It either creates an new js file if created cdisplays ireated is false, or
created is a boolean variable that is stored in the database and shows the data in the textarea if true. and If not, creates the file. It is initialized as false.

Once the file is created, created is set to true the sve() function can not be autimatically called.

The js file must be loaded before the value of created can be read, so I slight time dely is inserted:
setTimeout(“display()”,500);

To update, new data is placed in the text box, and clicking Save calls sve() directly.

cnt is stored in the js file that is created. The data is stored in an array, arr, and cnt provides the index of a new item.
iniStr provides non data variables to be stored.

var fileNameToSaveAs = “demo.js”; provides the filename either to be created or updated.

textToSave = iniStr + ‘\n’; provides the initial contents of the js file.
cnt is incremented for the neww array index.

if (document.getElementById(“t1”).value != “”){
arr[cnt] = parseFloat(eval(document.getElementById(“t1”).value));
textToSave = iniStr + ‘\n’;

If new data is being added it is given the value of the text box and the string to be placed in the js file us initialized.
Expressions must also be evaluated:
if (arr[cnt].indexOf(‘”‘ == -1)) arr[cnt] = parseFloat(eval(arr[cnt]));

for (var i = 0; i < cnt; i ++) {
if (isNaN(parseFloat(arr[i]))) arr[i] = ‘”‘ + arr[i] + ‘”‘;
textToSave += ‘arr[‘ + i + ‘] = ‘ + arr[i] + ‘;\n’;
}
}

The stored data is placed in textTpSave and quotation marks must be plced around strings:

textToSave is then given the new data:
textToSave += ‘arr[‘ + i + ‘] = ‘ + arr[i] + ‘;\n’;

The rest has been discussed before.

As can be seen expressions, such as Pi can also be shown.