A Windows Screen Capture and Editing Application

This is a small application for capturing either the full screen or a rectangular selection. After capture, a number of editing tasks can be performed before either saving to a number of formats or copying to paste into a graphics application for other work. It is based on FreeImage.dll, which can be shared among several graphics applications. The application itself is only 65kb. The code is a bit long to include here, but if you are interested, you can download the application with source code here. Click Downloads and download capture.zip.

The application is called on demand and must be started from a created keyboard shortcut.

There is no GUI and all operations are performed from keyboard shortcuts. On  opening the application from a key combination, the following popup  appears, which disappears on clicking OK:

Click image for larger view

keys

This popup can be recalled at any time by hitting H.

As can be seen, many editing options are available from various key combinations.

After dismissing the popup, hitting A will capture the entire screen, or holding the mouse button and dragging will select an area to be captured.

You will get the following popup:

Click image for larger view

scale

Changing the input value will resize the selection. Whether resized or not, clicking OK will move the selection to the upper left corner:

Click image for larger view

captured

A resized image would appear as follows:

Click Image for larger view

shrink

With the selected area isolated, further editing can be done by using the proper key combination. For instance,  clicking T opens an input box to change the tint of the image:

Click image for larger view

tint

On choosing a color to modify, you will get an input box with a setting to either increase or decrease the value. This is how it would appear with the red decreased to 60%:

Click image for larger view

cyan

Besides tint, changes can be made to brightness, contrast, saturation, sharpness and blur. Annotation can be added. A transparent color can be  chosen and the selection can be printed.

Hitting C will copy the selected image to the clipboard and S will open a file dialog to allow saving the image.

After the image is either copied or saved, the capture application closes, releasing system resources.

The small size and low resource use of the application allows it to start very quickly and makes it a very convenient method for easily capturing all or a part of the screen and performing basic editing. I have other screen capture software, but unless I need something not available in it, this is my screen capture application of choice.

View and Edit Pages on a Server Without FTP or Control Panel File Manager

Described is a method to directly edit web pages on a server without using an FTP client or the site host’s File Manager. I wrote it as one html and two php files.

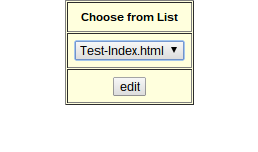
Here is how the html interface looks:

Click image for larger view

Editlist

and here is the code:

<!DOCTYPE html PUBLIC “-//W3C//DTD XHTML 1.0 Transitional//EN” “http://www.w3.org/TR/xhtml1/DTD/xhtml1-transitional.dtd”&gt;
<html><head><title></title>
<style type=’text/css’>
body {margin-left:0;margin-right:0;font:normal normal 900 12px Arial;}
table{
background-color:#FFFFDD;
}
td{text-align:center;}
a{ text-decoration: }
:link { color: rgb(0, 0, 255) }
:visited {color :rgb(100, 0,100) }
:hover { }
:active { }
</style>
</head>
<body>
<center>
<form action=”csvedit.php” method=”post”>
<table border=”1″ cellpadding=”8″>
<tr><td>Choose from List</td></tr>
<tr><td><select name=”s1″>
<option>template.css</option>
<option>js.js</option>
<option>studio.xml</option>
<option>Test-Index.html</option>
</select></td></tr>
<tr><td><button name=”submit” value=”submit”type=”submit”>edit</button></td></tr>
</table>
</form>
</center>
</body></html>


A form with a Select Control is created , with each Option listing the path to a file  that is to be edited.  The submission is posted to the first of the php files. On opening a file to be edited, the  php file will have the following appearance:

Click image for larger view:

Unedited

Here is the code:

<html><head><title></title>
<style type=’text/css’>
body {margin-left:0;margin-right:0;font:normal normal normal 12px Arial;}
a{ text-decoration: }
:link { color: rgb(0, 0, 255) }
:visited {color :rgb(100, 0,100) }
:hover { }
:active { }
</style>
</head>
<body>
<?php
$filename = Trim(stripslashes($_POST[‘s1′]));// open file
if ($filename == “studio.xml”) $filename = “Images/” . $filename;
if ($filename == “Test-Index.html”) $filename = “Images/” . $filename;
$fh = fopen($filename, “r”) or die(“Could not open file!”);
// read file contents
$data = fread($fh, filesize($filename)) or die(“Could not read file!”);
// close file
fclose($fh);
// print file contents
echo “<form action=’csvedit2.php’ method= ‘post’ >
<textarea name=’newd’ cols=’150′ rows=’35’> $data </textarea>
<textarea name=’t1′ cols=’30’ rows=’1′>$filename</textarea><br>
<input type=’submit’ value=’Change’>
</form>”;?>
</body></html>


The file selected from the html file is placed in a variable;

$filename = Trim(stripslashes($_POST[‘s1′]));

The text of the file is read and placed in a string;

$data = fread($fh, filesize($filename)) or die(“Could not read file!”);

A  form is then created with two textareas. The first will contain the  the text and the second the filename. A submit button is then added and the submission posted to the second php file;’

echo “<form action=’csvedit2.php’ method= ‘post’ >
<textarea name=’newd’ cols=’150′ rows=’35’> $data </textarea>
<textarea name=’t1′ cols=’30’ rows=’1′>$filename</textarea><br>
<input type=’submit’ value=’Change’>
</form>”;

Here is the code for the second php file:

<html><head><title></title>
<style type=’text/css’>
body {margin-left:0;margin-right:0;font:normal normal normal 12px Arial;}
a{ text-decoration: }
:link { color: rgb(0, 0, 255) }
:visited {color :rgb(100, 0,100) }
:hover { }
:active { }
</style>
</head>
<body>
<?php
$filename = Trim(stripslashes($_POST[‘t1’]));
$newdata = $_POST[‘newd’];
if ($newdata != ”) {// open file
$fw = fopen($filename, ‘w’) or die(‘Could not open file!’);
// write to file
// added stripslashes to $newdata
$fb = fwrite($fw,stripslashes($newdata)) or die(‘Could not write
to file’);
// close file
fclose($fw);
}// open file
$fh = fopen($filename, “r”) or die(“Could not open file!”);
// read file contents
$data = fread($fh, filesize($filename)) or die(“Could not read file!”);
// close file
fclose($fh);
// print file contents
echo “<form action=’csvedit2.csv’ method= ‘post’ >
<textarea name=’newd’ cols=’150′ rows=’38’> $data </textarea>
</form>”;?>
</body></html>

The edited text and the filename are placed in the variables $filename and $new data, respectively:

$filename = Trim(stripslashes($_POST[‘t1’]));
$newdata = $_POST[‘newd’];

The file is opened and the edited text written to it:

$fw = fopen($filename, ‘w’) or die(‘Could not open file!’);
// write to file
// added stripslashes to $newdata
$fb = fwrite($fw,stripslashes($newdata)) or die(‘Could not write
to file’);

Finally,  a new form is created with a textarea,  to allow the edited text to be viewed. The edited file is opened, the contents read and placed in the textarea:

$fh = fopen($filename, “r”) or die(“Could not open file!”);
// read file contents
$data = fread($fh, filesize($filename)) or die(“Could not read file!”);

echo “<form action=’csvedit2.csv’ method= ‘post’ >
<textarea name=’newd’ cols=’150′ rows=’38’> $data </textarea>
</form>”;

Here is how that appears:

Click image for larger view

Edited

Finally,

To show  that the text changes have been  saved, here is how edited file looks in the first php interface:

Click image for larger view

Reopen

Of course, anyone can use these files to change the pages of a website, so it would be best to protect access first by placing the files in a directory that is not routinely accessed and by password protecting the access. A previous post has discussed ways to do this  Click Here

Tabbed Web Pages

This post describes how to make the pages of a web site appear as tabs. They are actually divisions that look and behave as tabs.

I set the leftmost “tab” as the Home page, so that is how the page appears on loading  and on clicking the leftmost tab.

Click image for larger view

Page-Before

The “tab” background matches the “content” background, giving the appearance of a tabbed page. The non-active “tab” has a darker background.

On mousing over the non-active “tab”, the “tab” backgrounds are reversed, but the content has not been changed.

Click image for larger view

MouseOver2

Clicking the non-active “tab” changes the “content”, so it appears as if a new “tab” has been made active.

Click image for larger view

Tab2Click

Below is the code:

<!DOCTYPE html PUBLIC ‘-//W3C//DTD XHTML 1.0 Transitional//EN’ ‘http://www.w3.org/TR/xhtml1/DTD/xhtml1-transitional.dtd’&gt; <html xmlns=’http://www.w3.org/1999/xhtml’&gt; <head profile=’http://gmpg.org/xfn/11′&gt; <title>Tabbed Page</title>
<style type=’text/css’>
body {margin-left:0;margin-right:0;font:normal normal 700 15px Arial; white-space: pre-wrap} a{ text-decoration: }
:link { color: rgb(0, 0, 255) }
:visited {color :rgb(100, 0,100) }
:hover { }
:active { }
#tab1,#tab2{position: absolute; top:1% ; width:8% ; height:3% ;background:#BBBBBB;border-width: 1px; border-color: #CCCCCC; border-style: solid solid none solid; border-radius: 10px 10px 0 0; text-align: center}
#tab1 {background: #DDDDDD; left: 42%;}
#tab2{left: 50%; }
#content{position: absolute; top:4% ; width:100% ; height:94% ;background:#DDDDDD; padding: 10px}
</style>
</head>
<body>
<div id=”content”>
<br /><center>Tab1 is the active tab<br /><br />
<img src=”PJRose-resize.jpg” width=”50%” alt = ” ” /></center>
</div>
<div id=”tab1″ onmouseover=’hilite(“tab1”);’ onclick=’showText(“tab1″);’>Test1</div>
<div id=”tab2” onmouseover=’hilite(“tab2”);’ onclick=’showText(“tab2”);’>Test2</div>
</body>
<script type=’text/javascript’>
function hilite (el) {
document.getElementById(el).style.backgroundColor=”#DDDDDD”;
for (var i = 1; i <= 2; i++) {
var el3 = “tab” + i.toString();
if (el3 != el) {
document.getElementById(el3).style.backgroundColor=”#BBBBBB”; }
}
}
}
function showText(el2) { document.getElementById(el2).style.backgroundColor=”#DDDDDD”;
if (el2 == “tab1”) {
document.getElementById(“content”).innerHTML='<br /><center>Tab1 is the active tab<br /><br /><img src=”PJRose-resize.jpg” width=”50%” alt = ” ” /></center>’;
} else if (el2 == “tab2”) {
document.getElementById(“content”).innerHTML='<br /><center>Tab2 is the active tab<br /><br /><img src=”Am.jpg” width=”50%” alt = ” ” /></center>’;
}
}
</script>
</html>


Initially, all “tabs” are given the same css:
#tab1,#tab2{position: absolute; top:1% ; width:8% ; height:3% ;background:#BBBBBB;border-width: 1px; border-color: #CCCCCC; border-style: solid solid none solid; border-radius: 10px 10px 0 0; text-align: center}

The first tab is then given the same background color as the “content” and given a unique position:
#tab1 {background: #DDDDDD; left: 42%;}
#content{position: absolute; top:4% ; width:100% ; height:94% ;background:#DDDDDD; padding: 10px}

All other “tabs” are just given a unique position:
#tab2{left: 50%; }

There are two javascript functions; hilite(el) and showText(el2).

hilite(el) is called on a mouseover:
div id=”tab1″ onmouseover=’hilite(“tab1″)

function hilite (el) {
document.getElementById(el).style.backgroundColor=”#DDDDDD”;
for (var i = 1; i <= 2; i++) {
var el3 = “tab” + i.toString();
if (el3 != el) {
document.getElementById(el3).style.backgroundColor=”#BBBBBB”; }
}
}
}

A variable, el3 is created and compared to the id of the selected “tab”. If it is different, its background is darkened. That way, all non-active “tabs” are darkened without having to code them individually. The hover background is lightened,

On clicking a new “tab” , showText(el2) is called:
onclick=’showText(“tab1″);

function showText(el2) { document.getElementById(el2).style.backgroundColor=”#DDDDDD”;
if (el2 == “tab1”) {
document.getElementById(“content”).innerHTML='<br /><center>Tab1 is the active tab<br /><br /><img src=”PJRose-resize.jpg” width=”50%” alt = ” ” /></center>’;
} else if (el2 == “tab2”) {
document.getElementById(“content”).innerHTML='<br /><center>Tab2 is the active tab<br /><br /><img src=”Am.jpg” width=”50%” alt = ” ” /></center>’;
}
}

On clicking a new “tab”, the content “text” is changed with innerHTML.

Since this is only a sample, I have only used two “tabs”, but the number could be increased. Simply create a new division, give it a position, add the mouseover and click links, increase the limit of the looping and insert the new “content” “text”, which could include any valid HTML code.

A Windows Color Picker – Select Any Color Visible On The Screen

I had previously described a HTML Color Chooser, in which you could choose a color from a patch and get its value for entry. But what if you see a color, either in a web page or in an image viewer that would be perfect for either the background or font color of a website you are designing. Most graphics applications have a color picker, but is it really necessary to load a huge graphics application and resize it so you can see the rest of the screen, just to pick a color? Therefore, I wrote this small application (35.5 KB), that loads quickly and does the job.

Below is the appearance of the interface

Click image for larger view

colorPicker

Holding the control key down and clicking on a screen pixel insets both and rgb and hex value of the pixel color in the text box.

below is the code:

CONST sx = GetSystemMetrics(SM_CXSCREEN)
CONST sy = GetSystemMetrics(SM_CYSCREEN)
OPTION BASE 1
GUI “Form1”, PIXELS
DIM Form1 AS CONTROL
DIM Edit1 AS CONTROL
dim pt as POINT, col as COLORREF, r as integer, g as integer, b as integer, strd$, strg$, strb$
DIM DesktopWnd as HWND,DesktopDC as HDC
SUB FORMLOAD
Form1 = BCX_FORM(“Form1”, 0.357*sx, 0.342*sy, 0.284*sx, 0.315*sy)
Edit1 = BCX_EDIT(“”,Form1,201, 0.017*sx – 4, 0.151*sy – 46, 0.247*sx – 4, 0.046*sy)CENTER(Form1)
SHOW(Form1)
DesktopWnd = GetDesktopWindow()
DesktopDC = GetDC(DesktopWnd)
SetTimer(Form1,3000,100,(TIMERPROC) NULL)
SetWindowPos(Form1,HWND_TOPMOST,0,0,0,0,SWP_NOMOVE|SWP_NOSIZE)
END SUB
BEGIN EVENTS
SELECT CASE CBMSG
case WM_TIMER
if GetAsyncKeyState(1) <> 0 and GetAsyncKeyState(VK_CONTROL) <> 0 then
GetCursorPos(&pt)
col = GetPixel(DesktopDC,pt.x,pt.y)
r = IMOD(col,256)
b = Int(col / 65536)
g = (col – (b * 65536) – r) / 256
if r = 0 then
strd$ = “00”
else
strd$ = hex$(r)
end if
if g = 0 then
strg$ = “00”
else
strg$ = hex$(g)
end if
if b = 0 then
strb$ = “00”
else
strb$ = hex$(b)
end if
if len(strd$) < 2 then strd$ = “0” & strd$
if len(strg$) < 2 then strg$ = “0” & strg$
if len(strb$) < 2 then strb$ = “0” & strb$bcx_set_text(Edit1, “rgb(” & str$(r) & “,” & str$(g) & “,” & str$(b) & “)    ” & “#” & strd$  & strg$  & strb$)
SetForegroundWindow(Form1)
SetFocus(Edit1)
end if
case WM_CLOSE
KillTimer(Form1,3000)
ReleaseDC(DesktopWnd,DesktopDC)
END SELECT
END EVENTS


A timer is started so a window other than the application window can be searched.  GetAsyncKeyState(1) <> 0 and GetAsyncKeyState(VK_CONTROL) <> 0 tests if the left mouse button and the control key have been pressed.

SetWindowPos(Form1,HWND_TOPMOST,0,0,0,0,SWP_NOMOVE|SWP_NOSIZE) keeps the window on top of any other window

GetCursorPos(&pt) and
col = GetPixel(DesktopDC,pt.x,pt.y) get the color of the pixel under the cursor.

r = IMOD(col,256)
b = Int(col / 65536)
g = (col – (b * 65536) – r) / 256
if r = 0 then
strd$ = “00”
else
strd$ = hex$(r)
end if
if g = 0 then
strg$ = “00”
else
strg$ = hex$(g)
end if
if b = 0 then
strb$ = “00”
else
strb$ = hex$(b)
end if
if len(strd$) < 2 then strd$ = “0” & strd$
if len(strg$) < 2 then strg$ = “0” & strg$
if len(strb$) < 2 then strb$ = “0” & strb$

Thiis set of commands gets the rgb and hex values of the color.

bcx_set_text(Edit1, “rgb(” & str$(r) & “,” & str$(g) & “,” & str$(b) & “)    ” & “#” & strd$  & strg$  & strb$)

inserts the rgb and hex values in the text box.

SetForegroundWindow(Form1)
SetFocus(Edit1)

keep the picker window on top, despite clicking on another window.

If you want to look further at this application, use this link. Click on Downloads in the menu and download colorpick.zip. Included are the BCX and C source codes.

An HTML Reaction Time Tester

I had recently installed a Reaction Time Tester app on my phone and discovered that it did not work. I was going to try another when I decided I could write my own.  I could have chosen  from many different languages,  but decided to do it with HTML and Javascript, so it would work universally.

This is how the simple interface looks:

Click image for larger view:

RTInterface

You click the Start button and wait for the red button to turn green:

Click image for larger view

RTColorchange

When that happens, click the green button  and read the elapsed  time in the text box:

Click image for larger view

RT

Clicking the Start button restores the original interface so the procedure can be repeated for another reading.

Below is the code:

<!DOCTYPE html PUBLIC ‘-//W3C//DTD XHTML 1.0 Transitional//EN’ ‘http://www.w3.org/TR/xhtml1/DTD/xhtml1-transitional.dtd’&gt;
<html xmlns=’http://www.w3.org/1999/xhtml’&gt; <head profile=’http://gmpg.org/xfn/11′&gt; <title>Reaction Time</title>
<style type=’text/css’>
body {margin-left:0;margin-right:0;font:normal normal 800 15px Arial;} a{ text-decoration: }
:link { color: rgb(0, 0, 255) }
:visited {color :rgb(100, 0,100) }
:hover { }
:active { }
#t1{position: absolute; width: 10%; left: 45%; top: 5%; text-align:center; font:normal normal 800 15px Arial; background: #FFFCAA}
// #button1{position: absolute; width: 10%; height: 10%; left: 45%; top: 45%; background: green; color: white; visibility:hidden;font:normal normal 800 15px Arial; }
#button1{position: absolute; width: 10%; height: 10%; left: 45%; top: 45%; background: red; color: white; font:normal normal 800 15px Arial; }
#button2{position: absolute; width: 10%; left: 45%; top: 60%; font:normal normal 800 15px Arial; }
</style>
</head>
<body>
<button id=”button1″ type=”button” name=”button1″ value=”go” onclick=’start();’>Go</button>
<button id=”button2″ type=”button” name=”button2″ value=”init” onclick=’init();’>Start</button>
<input type=”text” id=”t1″ name=”t1″ value=”” />
<script type=”text/javascript”>
var then; var now;


function init() {
// document.getElementById(“button1″).style.visibility=”hidden”; document.getElementById(“button1″).style.backgroundColor=”red”;
document.getElementById(“t1”).value = “”;
var randno = Math.floor(Math.random()*4000 + 2000);
setTimeout(‘showButton()’, randno); }

function showButton() {
// document.getElementById(“button1″).style.visibility=”visible”; document.getElementById(“button1″).style.backgroundColor=”green”;
then = new Date(); }

function start() {
now = new Date();
var elapsed = (now – then) / 1000;
document.getElementById(“t1”).value = elapsed; }
</script>
</body></html>

On clicking the Start button, the function init() is called, which starts a random timer that changes the color of the Go button to green at an interval between 2 and 6 seconds.

var randno = Math.floor(Math.random()*4000 + 2000);
setTimeout(‘showButton()’, randno);

The random value is to prevent a tester from anticipating by counting a fixed interval. When the interval has expired, the showButton() function is called, changing the color and starting the timer.

document.getElementById(“button1″).style.backgroundColor=”green”;
then = new Date();

Clicking the Go button after it has turned green takes a new time and displays the difference of the times in the text box.

now = new Date();
var elapsed = (now – then) / 1000;
document.getElementById(“t1”).value = elapsed;

Clicking the Start button again removes the time from the text box and changes the Go button back to red, preparing for another test.

document.getElementById(“button1″).style.backgroundColor=”red”;
document.getElementById(“t1”).value = “”;

I had originally written the code so that rather than change color, the Go button would toggle between hidden and visible, but decided it was better to see the button at all times. However, I kept the original code and commented it out , so if you prefer, you can use it that way by changing the comment tags.
// #button1{position: absolute; width: 10%; height: 10%; left: 45%; top: 45%; background: green; color: white; visibility:hidden;font:normal normal 800 15px Arial;
#button1{position: absolute; width: 10%; height: 10%; left: 45%; top: 45%; background: red; color: white; font:normal normal 800 15px Arial; }

// document.getElementById(“button1″).style.visibility=”hidden”; document.getElementById(“button1″).style.backgroundColor=”red”;

// document.getElementById(“button1″).style.visibility=”visible”; document.getElementById(“button1″).style.backgroundColor=”green”;

I believe the absolute time reported is a function of the device used, so it could vary from device to device. However, it should be consistent for a given device, so a comparison between different testers on the same device should be reproducible.